Now we get to the really fun part: posting an entry! Let’s say you’ve just completed a project of some sort and you want to show it off, or you’ve got a question and want some advice from the other Crackpots. Post an entry to the blog, and let the other Crackpots comment on your project, or answer your question.
To post an entry, you’ll need to be in the “back end” of the blog, so the first thing you’ll want to do is click on the “Site Admin” link in the left-hand sidebar to get to the back end.
Once you’re there, you’ll see the Dashboard, just like you did when you first logged in. The second link on the top of the page, right next to “Dashboard,” will say “Write.” This is the link you use when you want to write an entry. When you click on it, the basic entry-writing interface appears:
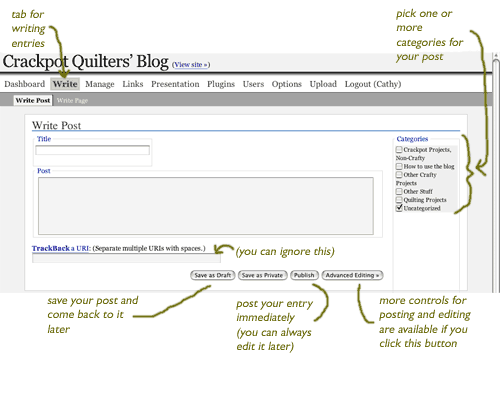
Each entry has a title (the title of this entry is “How to post an entry”) and the main block of text (this is the main block of text for this entry).
You can also designate one or more categories for your entry – this is helpful if you want to see all of the “how to use the blog” entries, or all of the quilting project entries. I’ve set up a few categories that I thought might be useful, but you can add new categories! Just go to the “Manage” link at the top, and choose “Categories” and then click on “Add New.” If you’ve got an entry that doesn’t fit any of the current categories, go ahead and add a new one!
Once you’ve written your entry, you have three options: post it immediately (the “Publish” button), save it and come back to it later (the “Save as Draft” button), or save it as a “private” post that only you can see. I’m not sure what use the “save as private” option is, but if someone can think of a use for it, please post a comment to that effect!
There’s also a button that gives you access to some advanced editing features. The most useful of these is the ability to set the date and time that your entry will appear – like post-dating a check – so that you can write an entry about a project that’s a surprise, and then post-date it so that the entry only shows up after the surprise-ee has been surprised. Another useful function that you can use on the advanced screen allows you to preview your entry before you post it.
That’s about all there is to say about writing an entry, so let’s go ahead and do
your next assignment: post an entry to the blog!
(Coming up next, the pièce de resistance: uploading an image!)