by Nancy

Here’s some of the crochet food I’ve made lately for a friend of my mom’s, who has requested 5 sets of various crochet foods for baby gifts, as well as a cheeseburger for herself!
by Nancy
Here’s some of the crochet food I’ve made lately for a friend of my mom’s, who has requested 5 sets of various crochet foods for baby gifts, as well as a cheeseburger for herself!
by Nancy
Only a week and a half until All Together Week – yay! It seems that quite a few Crackpots are involved with painting projects (!), so I’ve taken it upon myself to sort through the comments and try to come up with a good project for the Crackpot Quilting Day. First of all, it seems that Crackpots are flexible – no one insisted on one thing or another – everyone just wanted to get together and sew. There was a preference for a collaborative quilt top rather than individual projects and a preference for standard piecing rather than paper piecing. So, here are a few possibilities I’ve come up with so far:
Friendship Star Block
It’s nice and easy – just squares and half square triangles, so I think we could make quite a few. I think it would look good with bright, small-scale prints for the stars and a light background fabric. I probably have enough of a background fabric so that we could use the same one throughout.
Snowball Nine Patch
I found this one while browsing around and thought it looked cool. Still pretty easy, though it might require a bit more planning if we want the square from the 9 patch to match the snowball that is touching it.
Spinner
This block is from Bonnie Hunter’s Addicted to Scraps column in the March/April ’10 issue of Quiltmaker. They have a picture of how it would look together with other blocks if you vary the color of the central star but keep the whites and reds.
Batik Scramble
Ok, this one is a little hard to explain, and unfortunately I don’t have a visual aid for it. (Have I mentioned how much I dislike the new Quiltmaker website? It’s impossible to find any useful information. Aargh! But I digress…) The pattern is Batik Scramble from Quiltmaker Sept/Oct ’09. But I would change it to make it Scrappy Rainbows Scramble. If you have a picture of the quilt, what you would do is turn the even numbered rows over so that they go the same way as the odd numbered rows and look like rainbows. Then you’d do one row of red, then orange, yellow, etc. If you don’t have a magazine to look at, suffice to say it would involve 5″ squares of scraps in ROYGBIV colors and 2.5″ squares of background fabric and a flip and stitch technique.
Double 4 Patch on Point
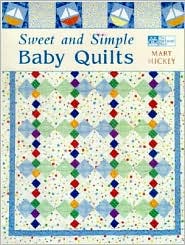
Imagine the block on the left on point, with a variety of colors for the small squares. There’s a quilt pattern called Wonder Baby from Sweet and Simple Baby Quilts by Mary Hickey, which some people may have noticed at Fields. It’s the quilt on the cover of the book, so you can get a glimpse of it here.
I have checked the book out from the library and have the complete pattern. I think it looks cute and fun.
Little Sister
This is from Quiltmaker Sept/Oct ’01 for those who go that far back.
It’s 9 patch blocks
on point, and the effect is similar to Wonder Baby.
Ok, Crackpots, that’s all I have time for. What looks good?
P.S. To the Creator of the Blog – I hope you are impressed by my Posting of Pictures from Other Sites and Linking skills. I’m mightily impressed with myself. 🙂
by Nancy

One of the many items on my To Do list has been to make a valance for Andrew’s room. He only has one window now since the addition to the back of the house, and it was looking very empty. So, I used some of the states fabric, which he loves, that was leftover from his pillowcase to make this valance. I based it loosely on a valance idea in Debbie Mumm’s Cuddle Quilts for Little Girls and Boys.
In other news, the Butterfly baby girl quilt is done! And the baby hasn’t been born yet – this may be a new record for me! I need to take a picture so I can post it. I made a doll quilt for the baby’s big sister, which is done except for blind stitching the binding to the back. And I am crocheting a baby doll for the big sister as well. It’s from Amigurumi Two, Crocheted Toys for Me, You, and Baby, Too, by Ana Paula Rimoli. You can see a picture of what it will look like here.
by Nancy

This is a chocolate ice cream cone that I made for Agnes (Helene’s youngest) to go along with her other crochet food for her 2nd birthday, which is coming up in May. I also made a bag to hold all the food, and it is now all packaged up to be mailed to Germany.
by Nancy
I heard back from the Handmade Market about my application, and unfortunately, I did not get a spot. They said that they had lots of applications and that they weren’t able to give me a space. I don’t know if they decided based on which applications were received first or what the criteria were.
So, I’m turning my attention to the butterfly baby quilt:

by Nancy
I’m happy to report that my Secret Crackpot Crochet Project is finished! 🙂 And I’m very pleased with how it turned out. I think the recipient will like it too.
Once I finished that, I started on a crochet eggplant, which is now done. I’ve take a picture but haven’t downloaded it yet. I have to say it is one of my favorite crochet veggies so far. Who doesn’t love a crochet eggplant?
Prior to starting the Secret Project, I made this cupcake, simply because it was cute. It was my first foray into beading, though of course only very basic beading. I decided to give it to my friend Lee, whose birthday is today.

Well, see, it was like this. We were at the CLH for New Years, and I decided that it was high time that I started quilting the Crackpot Summer 2008 Star Quilt. I didn’t have my quilting gun or a very good place to spread out the quilt for basting, but I was very – um – determined, so I pushed ahead, laying the quilt out on the dining table and basting by hand. But the table wasn’t really big enough so I didn’t tape the quilt to the table before basting it and it was a bit puckery but I figured that wouldn’t matter all that much but then the basting stitches kept getting caught in the presser foot but I quilted two blocks anyway, being very determined, but then it became obvious that it was getting more and more puckered up and it was fast becoming a disaster and I gave up and took out all the quilting, which was a pain because I had used monofilament thread that really is almost invisible and I also took out all the basting and decided to start all over again when I was home and had better equipment.
Which I did a couple of days ago using the new and amazing Magic Sewing Table, which, after I pushed the sewing machine down to the storage position and put the solid piece in place to cover the hole, turned out to be exactly the right size for spreading out the quilt to baste. And since the Magic Sewing Table is on casters, I could easily move it away from the wall so I could walk all the way around it, which is much better than crawling around on the kitchen floor, especially since it eliminates the first step of washing the kitchen floor. So I got it all perfectly basted and then turned and basted the edges while watching “Emma” on PBS. Then last night I finally started on the quilting, and the Magic Sewing Table again showed it’s stuff. There is lots of room to spread out the quilt and wrestle it under the machine. Since I am now sitting up much higher with respect to the bed of the machine, it is much easier to see what I am doing and steer the fabric under the needle. And for some reason, I even have much better control of the foot pedal. So I quilted 3 of the 9 blocks on the quilt last night in less than an hour, and it looks fantastic, if I do say so myself. But of course, most of the credit goes to the Magic Sewing Table. (-: [And, Nancy, how do you get those cute little smileys into your posts??]
by Nancy
I had some fabric leftover from the center of Gabe’s quilt, so I decided to make him a large bib with a pocket. I still had leftover fabric after that, so I made several more like this for eventual sale (I hope!).

After a while I got tired of making large pocket bibs, so I made this medium bib and used some of my 2.5″ scraps for the back.


For those who are wondering, I am still crocheting. In fact, I am working on my Largest Attempted Project To Date, but it cannot be revealed to all Crackpots at this time, so you’ll have to wait a bit to see it.
Yes, Crackpots, at last my New Quilting Studio, courtesy of Melvin and Father Christmas, is ready for show and tell.
First we need to see the Before photos in order that you may fully appreciate the improvements.
 In this photo, note how the machine sits up on the desk, too high for comfortable stitching and easy viewing of the work area.
 Here we see a larger view of the work area showing the ironing board. Note the location of the wardrobe.
 A view from still farther back showing most of the available space.
 One more view, showing the space where the New Sewing Table will go.
And now for the transformation……Ta Dah!!!
 Note the comfy chair, the sewing machine at a much more comfortable height, and the large space available for cutting fabric, laying out fabric for piecing, and for supporting fabric for large projects, like quilting a certain wall quilt. Also note the presence of Pug.
 Another view. Note that the freezer is still available as a work surface and that it is now much more conveniently located relative to the machine. Also note the abundant lighting available from a variety of angles.
 A long view. Note the new locations of the bed and the wardrobe, providing greater privacy for those availing themselves of the guest room option. Also, the top of the wardrobe now makes a great cat place with easy access from the stairs. If Pug ever figures it out.
And finally…
 the really long view. Note the large open space that will be of interest to younger non-Crackpots who wish to avail themselves of the ball-playing and American Revolution reenactment features of the space. And to Pug.
Right now, I’m making a quilt for my friends’ son. Like many crackpot projects, I bought the fabric without a pattern in mind, and by the time I got partway through sewing pieces together, I found that the plan needed some editing. The fabric I’d intended to use for the inner border just wouldn’t work.
On to Plan B – get some solid brown fabric. Of course, the brown I need is not regular brown, it’s Weird Reddish Brown. I visited three fabric stores, and found plenty of brown, but none of the weird reddish variety.
But I’m a Crackpot Quilter. I can handle mid-project redirection. The next weekend I went back to a fabric store looking for dark olive green. No luck. Maybe blueish? Nope.
By then I was running out of plans (having rejected A, B, C, and D), and was thinking about sending a plea for fabric assistance out to my fellow Crackpots. There was only one place left to look: my stash. Like all the Crackpots, I have a fabric stash. the size of which I’m unwilling to reveal. Most of it is intended for future projects that are currently in the “conceptual” phase of creation. (And many of those projects have been in the conceptual phase for many years, but let’s not talk about that).
Down in the third drawer I found some solid fat quarters I’d purchased at the quilt show in Chicago a few years ago. I was going to make a wall hanging my living room. Lo and behold, the brown fat quarter was Weird Reddish Brown (which wouldn’t match my couch anyway). Project saved!
Now I just need to decide where to cut the outer border fabric – the stripes are a bit wavy, and I always find dealing with the “artistic” stripes when trying to make a straight border that looks good a challenge.
Here’s what I have so far (click to biggify):
