Crackpotters – Have you noticed that you get an apparently automatic e-mail message whenever someone posts a comment to one of your posts on the blog?? Pretty cool! Except it’s also a little weird if you post a comment to your own post. Then you get an e-mail telling you what you just did! Also, since it tells you what was said in the comment, it sort of makes it superfluous to go dashing off the the blog to see what was said, but I do that anyway!! 🙂
Archive for December, 2005
Automatic e-mails
Saturday, December 31st, 2005Associate Crackpots
Thursday, December 29th, 2005Hi, Crackpots,
After doing the previous assignment on how to post a comment on the blog, I realized that much of what I wrote probably should have been in a separate Post. So here it is:
I have been wondering if we Crackpots might want to consider making my friend Mary in FL an Associate Crackpot. She loves to quilt and belongs to a quilt group in FL, and I usually share my Crackpot projects with her. I think she is a bit envious of all the fun we have together. I told her about our site in an e-mail I sent her yesterday and suggested that she check it out when she has a chance. She is in VA now to spend holiday time with her children, so I don’t know when she will have a chance to view the site, but I did just get e-mail from her, and she promised to check out the site as soon as she gets home and can use something other than the computer in the local library. Incidentally Mary is the person who sent me the quilters chain letter, but don’t hold that against her. (-:
Anyway, what are Crackpots’ thoughts?
Ann
Nicholas’ Quilt
Wednesday, December 28th, 2005Good news! My crackpotty dilemna about what to do with the borders of Nicholas’ big boy bed quilt has been solved. Marty and I went to the small JoAnn’s near our house today because I suddenly realized I was nearly out of white and off-white thread. While we were there, we of course browsed through the fabric and I found more of the flannel vehicle print! Yay! So I bought enough of it to re-do all 4 borders in case the color of the new fabric is slightly different from that of the old fabric.
Welcome to the Crackpot Quilters’ Blog!
Saturday, December 24th, 2005Welcome, Crackpots, and Merry Christmas!
This is my Christmas present to all of us: a weblog, or “blog,” that I’ve put together so that we can have a place on the web to share our Crackpotty projects and other stuff. We can post pictures and stories, and comment on each other’s projects and ideas.
Each of you has been given a username and password for access to the blog, and I’ve written up a series of entries that show you how to use the blog, going in gradual steps from logging in, through commenting and posting entries, all the way to uploading digital pictures and adding them to your blog entries.
One thing that sets this website apart from other blogs is that we five are (hopefully) the only people who can post entries and comments. Many blogs are set up with one or several authors, and then comments are open to the whole world. I figure we don’t especially care what the whole world thinks of our quilts and other Crackpot projects, so I’ve set things up so that only the five of us can participate.
Since I’ve set up the blog (and the web domain registration, hosting, and all the other stuff that goes along with this), I’m the administrator of the blog and have administrative powers to do all sorts of things, and fix all kinds of problems. The end result of which is, if there’s a problem or you can’t figure out how to do something, let me know! I’ll do whatever I can to fix the problem. If you’d like some technical information about the blog, you can read The Fine Print.
Because blogs are generally set up so that the most recent entries are at the top of the page, and proceed backwards in time, the “how-to” entries that I’ve put together are in backwards order. So to get started, scroll down to the bottom of this page, to the entry titled “How to log into the blog,” and start reading the directions.
Have fun!
How to upload an image
Saturday, December 24th, 2005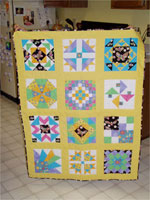
Here’s a photo of Andrew’s bug quilt (the same photo, in fact, that supplied the image up in the blog header). How did I get it to the blog so that I could show it off to the rest of you, and how can you do the same thing with your photos?
It’s a bit complicated, but it’s kind of the main reason why I put the blog together, so stick with me here while we go through all the steps.
First off, you’ll need the photo. You’ll probably want to edit it somewhat after you take the picture, to reduce the size of the image (in pixels) and the size of the file (in kilobytes). Right now the blog is set up so that you can upload a photo as long as it’s less than 300kb in size – if that becomes a problem I can change it to a larger file size. You will probably want to make sure that the photo is no more than 500 pixels wide – that’s about how wide the main part of the screen is on most browsers. If you’re not sure how to do that, there are some ways around it that I’ll show you.
Once you have your image file saved on your computer, head to the “back end” of the blog and click on the link at the top that says “Upload.” You’ll see the screen for uploading a file, which looks like this:
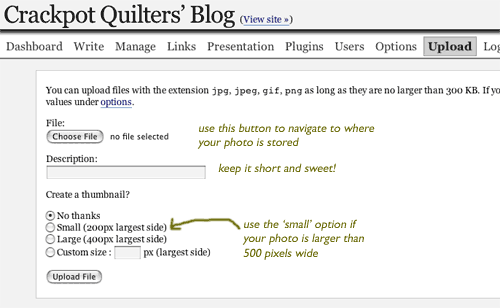
Click on the “choose file” button and navigate to wherever you have your photo saved.* Once you’ve selected your photo, a little icon and the filename will appear next to the button.
*Mom and any other Macintosh users out there: if your photo is in your iPhoto library, ask me for help in how to find it.
The “description” box should just contain a few words about the photo – what you type here won’t show up on the entry, so don’t write a whole huge paragraph. For the photo I used in this entry, it just says, “Andrew’s bug quilt.”
The last bit gives you the option of creating a small “thumbnail” of your image, which appears on the blog entry. If a reader clicks on the image, they’ll be taken to the full-sized photo. This is a good option if you’re not sure how to resize your photo so that it’s less than 500 pixels wide. For the photo I used in this entry, I already had it shrunk down pretty small, so I didn’t bother.
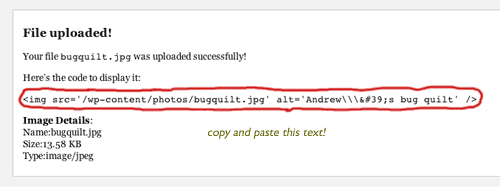
When you click on the “upload file” button, you SHOULD get a message that indicates that your file uploaded successfully. If you don’t, let Cathy know! With luck, she can fix whatever the problem is. You’ll also get another very important piece of information: the code that you should use in your blog entry to get the image to show up:
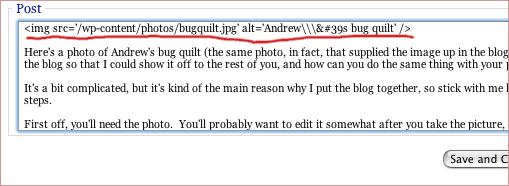
Just copy that line of code, and paste it into the main part of your entry, like this:
That’s all there is to it! It’s a lot of steps, but it should work. You can also (I’m pretty sure!) use a photo in a comment: just cut and paste the link into the comment text. As always, if it doesn’t work for you, ask Cathy! Now:
Your last assignment: post an entry or a comment with a photo!
SPECIAL BONUS GEEK INFORMATION: As an added bonus, you can use the file-upload space as web hosting for photos that you want to use elsewhere. You’ll need to edit the link just a bit, but it should work, if you don’t have web-hosting space anyplace else. So for example, if I wanted to link to the photo above on a completely different website, I’d change the link to read: src=”http://www.crackpotquilters.net/wp-content/photos/bugquilt.jpg”. If you have no idea what this means, don’t worry! But if you do know what I’m talking about, feel free to use it! We have lots more disk storage space and bandwidth quota than we will ever need.
How to post an entry
Saturday, December 24th, 2005Now we get to the really fun part: posting an entry! Let’s say you’ve just completed a project of some sort and you want to show it off, or you’ve got a question and want some advice from the other Crackpots. Post an entry to the blog, and let the other Crackpots comment on your project, or answer your question.
To post an entry, you’ll need to be in the “back end” of the blog, so the first thing you’ll want to do is click on the “Site Admin” link in the left-hand sidebar to get to the back end.
Once you’re there, you’ll see the Dashboard, just like you did when you first logged in. The second link on the top of the page, right next to “Dashboard,” will say “Write.” This is the link you use when you want to write an entry. When you click on it, the basic entry-writing interface appears:
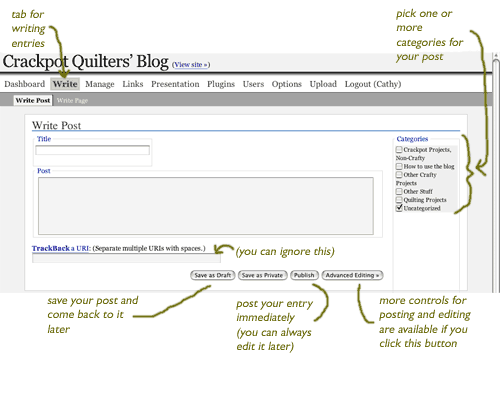
Each entry has a title (the title of this entry is “How to post an entry”) and the main block of text (this is the main block of text for this entry).
You can also designate one or more categories for your entry – this is helpful if you want to see all of the “how to use the blog” entries, or all of the quilting project entries. I’ve set up a few categories that I thought might be useful, but you can add new categories! Just go to the “Manage” link at the top, and choose “Categories” and then click on “Add New.” If you’ve got an entry that doesn’t fit any of the current categories, go ahead and add a new one!
Once you’ve written your entry, you have three options: post it immediately (the “Publish” button), save it and come back to it later (the “Save as Draft” button), or save it as a “private” post that only you can see. I’m not sure what use the “save as private” option is, but if someone can think of a use for it, please post a comment to that effect!
There’s also a button that gives you access to some advanced editing features. The most useful of these is the ability to set the date and time that your entry will appear – like post-dating a check – so that you can write an entry about a project that’s a surprise, and then post-date it so that the entry only shows up after the surprise-ee has been surprised. Another useful function that you can use on the advanced screen allows you to preview your entry before you post it.
That’s about all there is to say about writing an entry, so let’s go ahead and do
your next assignment: post an entry to the blog!
(Coming up next, the pièce de resistance: uploading an image!)
How to post a comment to the blog
Wednesday, December 21st, 2005Okay! Now you’re logged in and ready to get going. Here I’ll explain how to post a comment to an entry that someone else (or you!) has already posted. This is actually pretty easy and self-explanatory, so if you’re feeling anti-authoritarian, just skip to:
Your next assignment: post a comment to this entry!
To post a comment to an entry, just click the link below that entry that says “No Comments” or “2 Comments” or however many comments there are:

The comment-writing interface is fairly simple, because it’s designed for anyone in the whole world (not just you Crackpots) to use:
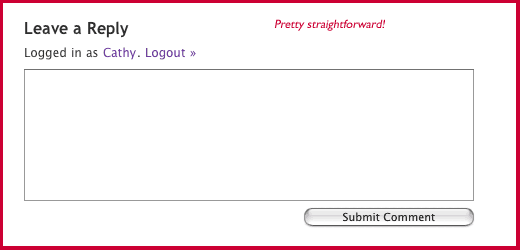
That’s the idea behind blogs, basically: one or several people put their ideas on the web, and everyone else comments on them and joins a conversation. However, this blog operates a little differently: we don’t necessarily care what everyone in the world thinks of our quilts and other Crackpot projects, so I’ve constructed the blog so that only the five of us can comment.
You have to be logged in to comment, and if for some reason you’ve gotten logged out and try to post a comment, the blog will make you log in first. But you already know how to do that, right? So go ahead and try….
Your next assignment: post a comment to this entry!
How to log in to the blog
Wednesday, December 21st, 2005Okay, here we are at the bottom of the page!
So, the first thing you’ll want to do is log in to the blog, so that you can post comments on other people’s entries (or even on your own!) and post entries of your own.
Over in the right-hand sidebar, there’s a section labeled “LOGIN HERE”. It should look like this:
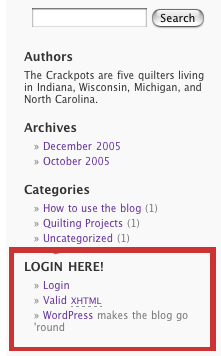
Click on the link for “Login,” and you’ll be taken to a login screen that asks for your name and password (which is what you got on the little card in your gift box). Both the name and the password are case-sensitive, so pay attention to capitalization! Also, you can change your password if you like, and if you ever forget your password, there’s a link on the login page to reset it. Or, just let Cathy know and she can reset it for you.
Once you’ve logged in, you’ll be taken to a page called the “Dashboard,” which looks something like this:
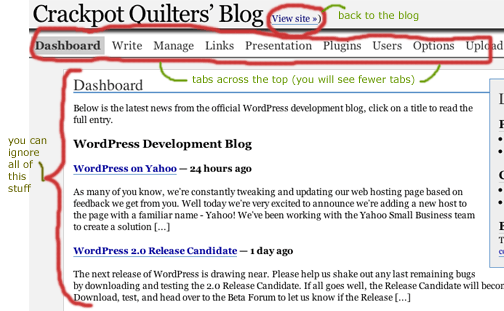
This page contains news and information for people who administer blogs, but you can ignore all of it – that’s for Cathy to worry about. There are also links across the top for things you can do with the blog, like write entries or update your user information – we’ll get to all that later.
This whole side of the blog is the “back end” — the part where the internal workings of the blog happen — and it looks very different from the “front end” so it’s easy to tell which side you’re on. To get back to the front end of the blog, click on the link at the top of the page next to the title that says “View site.”
Once you’re back at the blog, you’ll know you’re logged in, because the links under “LOGIN HERE” will change and look like this:
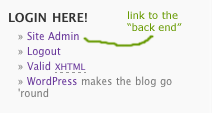
“Site Admin” is the link that takes you to the back end – you’ll need this later when you decide to post an entry.
Your first assignment: log in using the link in the sidebar on the right, and then come back and read the next entry, “How to post a comment to the blog.”