Archive for January, 2007

Steeking Q & A

Wednesday, January 31st, 2007

Ann asked some questions about my sweater, and I figured I’d answer in a new post

I’m curious about whether you had any problems with your yarn getting sucked down into the bobbin area in your sewing machine as you stitched. The proprietor of our local yarn shop told me that that is her greatest worry about steeking – not the cutting, but the stitching – and we discussed the wisdom of basting some tracing paper to the back side of the sweater to prevent that problem. Or did you stitch with the wrong side of the sweater up?

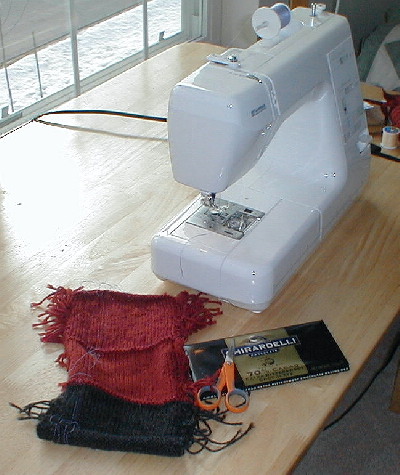
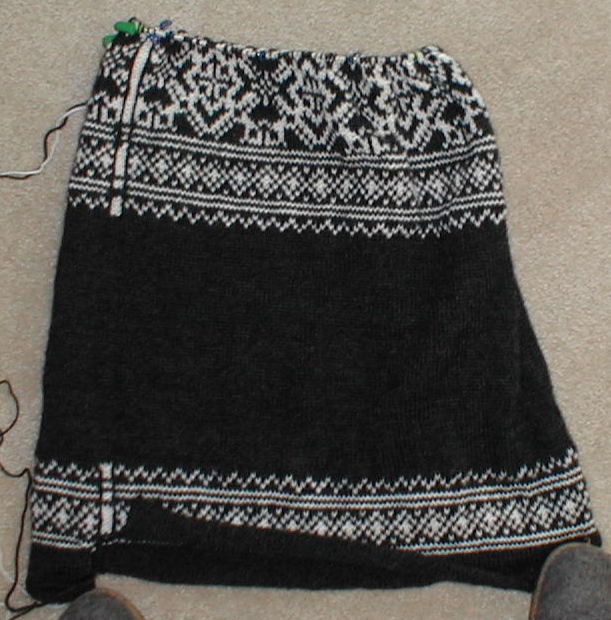
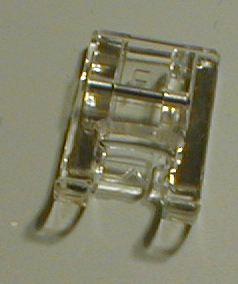
I was nervous about problems when doing the sewing, but it went much more smoothly than I’d feared. The hardest part of the process was remembering to breathe while stitching the seams. I did the seaming with the right side of the sweater up and had no problems with yarn getting caught in the feed dogs or sucked down into the bobbin area. I used a stitch length of 2 (I’m not sure what the units of stitch length measurement are – millimeters, maybe?). The major change from my usual sewing was to use a different presser foot. According to my sewing machine manual, it is the Satin Stitch Foot. Most of the foot is clear plastic, and there is a handy arrow pointing toward where the needle is, so that helped immensely in “aiming” exactly where I wanted to sew into the needle. There’s probably some technique for taking good pictures of small, transparent plastic things, but I don’t know it, so here’s my best shot:

SteekingPresserFoot

I do admire your persistence in redoing your sleeves to get them to fit just right, but why did you cut off (aaaaaagh!!!) the top of the sleeve before redoing it rather than unravelling it?

I had a couple of reasons –
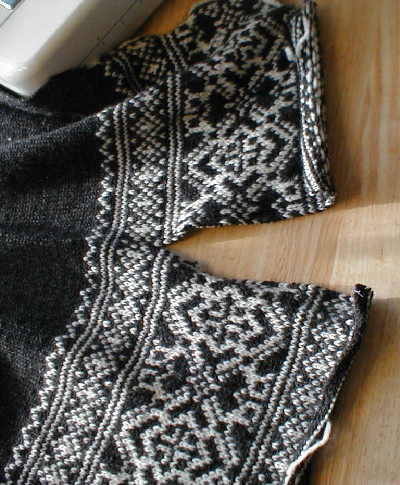
1. I put a bunch of effort into those sleeve tops, and I figured I could re-make the sleeve tops into hats or something else useful.
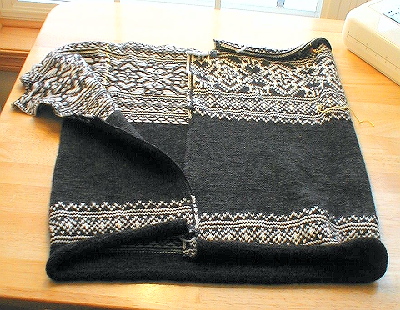
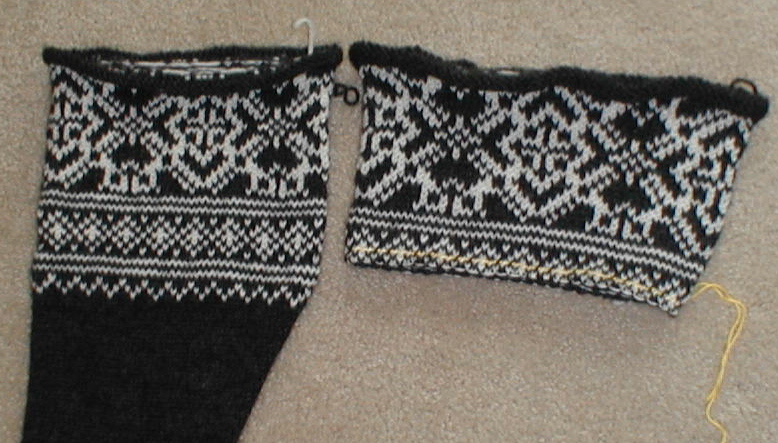
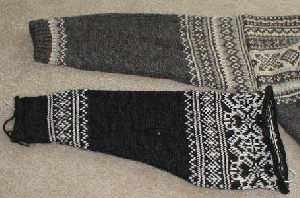
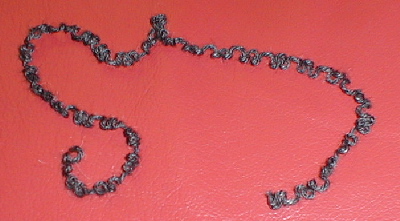
2. I’d already blocked the sleeves, so the unravelled yarn was really, really crinkly and would’ve require re-conditioning to be knittable. I had plenty of extra gray yarn, and bought more off-white yarn (which is a good thing, because I had to use some of the new skein to finish off the body knitting). This picture doesn’t fully convey the 3-dimensional crinkliness, but you can get an idea:

CrinklyYarn

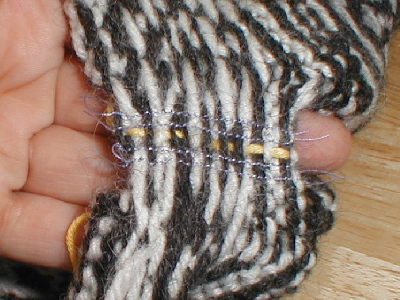
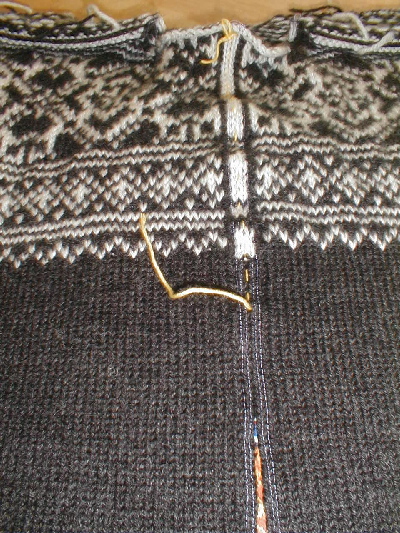
To avoid disaster when cutting off the sleeves, I ran smooth cotton yarn through the row of stitches where I wanted to begin knitting again, then skipped three rows of knitting, and ran another length of yarn through an entire row. I cut through the middle of those three skipped rows, then was able to put the yarn-held row of stitches onto a circular needle, unravel the row above it, splice in the new yarn, adn begin knitting again. On my sleeve comparison, you can see the yellow “holding” yarn on the sleeve top.

And call me old fashioned, but I really don’t understand why anyone would choose to “cardiganize” a sweater. If you want a cardigan, why not just knit one?? I guess it’s just a Scandinavian thing.

The sweater pattern is for a cardigan – it’s just the Norwegian style to knit the sweater in a big tube with extra cutting stitches in the middle front, and then steek it.

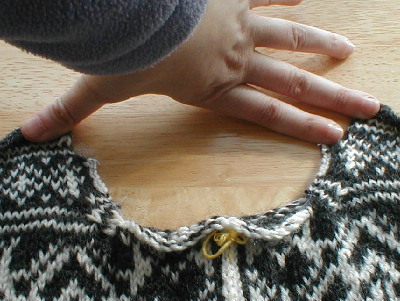
And now, off to work on picking up stitches for the neckband!

Baby Quilt Blocks

Wednesday, January 31st, 2007

These baby quilt blocks are now in the mail to Nancy for assembly, but I took a couple pictures last night before packing them up.

First, Log Cabin with a Chain:
BunnyLogCabin

(I somehow picked the wrong bunny when fussy-cutting the one that ended up in the lower right corner – it should be looking up like the other left-facing bunnies)

Second, a block called Review:
ReviewBlock

Steeking!

Sunday, January 28th, 2007

Once the major parts of my Dale sweater were knitted, the next step was to cut the steeks to cardiganize it and provide a place to sew in the sleeves.

First, I assembled the necessary supplies:

SteekingSupplies

I used my swatch to practice sewing on knit fabric and adjust my sewing machine setup.

Then, it was time to sew the first reinforcements on my sweater. I started with the front neck steek, sewing two lines of stitching on each side of the cutting line. Here’s what it looks like on the wrong side – the yellow yarn is used to indicate where I’ll cut.

SedalenNeckSteekSewn

After cutting the steek, the neckline is now separated, and you can see the curve formed by the decreases on each side of the steek:

SedalenNeckSteekCut

Next, I sewed the reinforcements for the center front steek. Here you see the cutting in progress. I put cardboard (an empty cereal box) inside the sweater to prevent accidentally cutting through the back of the sweater.

SedalenBodySteek

It’s a cardigan!

SedalenBodySteekDone

Then it was time for chocolate consumption. I also sewed the body and sleeve hems yesterday.

This morning, I sewed and cut the sleeve steeks. Unlike fair isle sweaters, traditional Norwegian sweaters don’t have extra cutting stitches added for the sleeve attachment – the sewing and cutting happens through the patterned stitches.

SedalenSleeveSteek

The aftermath:

SedalenSteekingAftermath

The hardest part of knitting a sweater

Saturday, January 27th, 2007

At lunchtime knitting at work this week, one of my coworkers asked what the hardest part of knitting a sweater is. It took me some thought to come up with an answer – for me, the most difficult part is having the patience to get things right – especially when I need to re-do a part of a sweater.

Speaking of re-doing, those Dale sleeves which I’d decided were too wide at the top? I cut off the top and reknitted with smaller needles (.25 mm really does make a difference – the second time around I used 3.0 mm needles instead of 3.25) and I didn’t do all of the prescribed increases so there were 10 fewer stitches.

Here’s the result: re-done sleeve on the left, old sleeve top on the right.

SedalenSleeveRedux

And, to prove that the second time is the charm, here’s my sleeve compared to the sleeve of the Norwegian sweater I got from Dad:
SedalenSleeveComparison

My next block

Tuesday, January 16th, 2007

Here is my third block for the Todd baby Quilt #2. It is Darting Minnows.

Darting Minnows

This was made with the ruler set “Tri-Recs” I got at the Early Morning After Thanksgiving Joann’s Shopping Festival. It was a cinch to make those long narrow triangles with these rulers. You cut a strip the required size then use the rulers to cut, turning them upside down every other cut. To cut the mirror images of the long narrow triangles, you fold the strip right (or wrong) sides together and cut both at the same time. Everything fit together perfectly, which did not always happen in the past. I would recommend the “Tri-Recs” ruler set if you are going to make a number of blocks with these shapes–especially if you get them on sale.

Norwegian Sweater Body

Sunday, January 14th, 2007

I’m plugging along on my Dale of Norway sweater, and am approaching the top of the body. It’s going well, but I think I’m going to re-do the tops of the sleeves (the whole 2-color part) because they’re wider than I’d like. My gauge was a little off (I’ve been using a 3mm needle on the body and that’s turning out better than the 3.25 mm needle I used on the sleeves), and I think I’ll also not do any increases through the upper arm. This will make it much closer in size to Dad’s sweater.

Now, as to the picture of the body – the top is scrunched because my circular needle is 24″ (and the sweater body is closer to 40″ around). In the picture, the funky stripey thing to the left is where I’ll be cutting the front opening (this is a cardigan). I was trying to hold down the hem (which likes to curl as it hasn’t been blocked) with my toes, but I missed part – hence the folded up gray part at the bottom.

SedalenBody

Sofa Pillows

Sunday, January 14th, 2007

When I decided to make my living room color-coordinated with, well, itself, it was clear that my green futon cover had to go. I bought a brown one, and of course my blue bolster pillows also needed to be re-covered to match the new color scheme. I suppose I could claim that I painstakingly knitted a lovely fair isle sweater for these pillow covers, but I actually just went to the Goodwill store and bought some sweaters to felt them. Before anyone accuses me of knitwear blasphemy, I must clarify that I did make sure that the red sweater wasn’t hand-knit (I think it was from Lands’ End).

bolsterpillows

The piecing of the pillow covers was required due to the size and shape differences between sweaters and bolster pillows. You’ll note that some of the red pieces are larger – that was to eliminate two seam allowances because I was that short on fabric length/width for some pieces.

The square pillows are pretty basic – the fronts are some fabric I picked up in Hawaii, and the backs are some leftover fabric from a skirt I made a few years ago (the pillows are identical, you are looking at the front of one and the back of the other). Have I mentioned how much I love my sewing machine’s one-step buttonhole function? Wow.

sofapillows

The Shawl

Sunday, January 14th, 2007

Here are some pictures of one of my two favorite Christmas gifts. (The other will remain unpublished because of the boys’ pictures on it.)

It is a shawl that Rebecca knitted for me. The yarn is wool and silk, and the lace knit is gorgeous. I just love it! The first picture is a full view.

shawl 1

In the next picture, you can see the detail of the knitting. Some project, isn’t it?

shawl detail 1

And how did she know that this blue was my favorite color?

Little Princess #2 quilt

Sunday, January 14th, 2007

Here are photos of some of the blocks for the Second Little Princess, Elizabeth’s baby sister. I think we are going to have a great looking quilt. The blocks are, from top to bottom,

Marty’s Duck and Ducklings
Duck and Ducklings

Emily’s Crazy Block
Emily\'s crazy block

Barb’s Block #1
Barb\\\'s block

Marty’s Star of Hope
Star of Hope

Barb’s Bunny Trail
Barb\\\'s Bunny Trail

Emily’s Ducks and Bunnies
Emily\\\'s dots and bunnies

Purse

Friday, January 12th, 2007

Here’s my latest – a purse made more or less according to directions in the Quilts and More magazine that Cathy blogged about a while back.
purse
This project provided some challenges, and I’ delighted that it turned out just fine with no major snafus along the way. The purse has two large lined inner pockets,and the directions called for fusing tricot interfacing to all the pieces and putting batting between both the outside pieces and the pockets. The folks at Joann’s had no idea what tricot interfacing is and, when I told them I was making a purse, recommended a fusible interfacing that is a lot like a very thin, dense quilt batting. I quickly realized that, if I interfaced every piece, I would have something that was way too thick. So I interfaced just one piece of the front, back, and each pocket, and that worked fine. The small outside pockets that you see in the picture were not on the pattern, and I added them because I really like having outside pockets for my sunglasses and keys. They are not interfaced. The directions call for a magnetic snap closure, and that’s what I used, but I think it is too heavy for the fabric. Next time I will use a velcro circle. Putting the purse together was pretty straightforward until I got to the binding. The directions called for 2.5″ wide bias single fold binding and also called for simply extending the binding to make the shoulder strap. I didn’t think single fold binding would wear well, and I didn’t like the idea of having a very thin strap of stretchy bias-cut fabric. So I cut strips on the straight grain for the strap and on the bias for the binding. I did a bit of test binding with muslin and decided that using the 2.5″ wide strips to make double fold binding would work just fine. In fact, I think single fold binding would be way too wide. The tough part was stitching the binding to the purse which consisted of a front, a back, and two pockets, each with interfacing in them. I could barely get the whole thing under my presser foot, but my 60’s vintage Singer rose to the challenge and stiched through it all without a glitch. Once the binding was attached to one side the directions called for folding the binding over to the other side, lining up the edge carefully with the stitching that attached the first side, and machine stitching the back edge of the binding. Yeah, right. I stitched it by hand, and it looks great. Then came the strap. At Marty’s suggestion, I interfaced that, and it was a good idea. I used 2.5″ wide strips folded in half and hemmed, so that the finished strap is a tad under 1″ wide. Of course, that made it wider than the binding to which I thought it would be attached, but a second look at the purse showed me that I could attach the strap to the top tip of the purse itself, stuffing a .75″ long unattached “tail” of binding at each end up into the strap to secure it. It worked just fine, and I now have the purse stuffed with all my stuff, and I’m planning to take it to FL. Oh, yes, and I’m very glad I have my notebook from Cathy to write all of this in, especially since I’m planning to make another one for my young friend, Carrie, using some pieced “fabric” that she brought back from Africa and gave to me. But first on the agenda is a quilt for my great nephew, Bennett, who is now 5 months old and, as far as I know, quiltless.