Archive for the ‘Quilting Projects’ Category

Mini Project = Great Satisfaction

Friday, March 23rd, 2012

by Nancy

Mini Zipper Pouch

I’m finding that doing little projects is giving me great satisfaction at the moment! There’s something to be said for a little not-so-delayed gratification every once in a while. This cute little zipper pouch was one of those quick little projects, and I’m thrilled with the results. It comes from Fat Quarter Fonts. It involves a zipper, which I was a little nervous about attempting, but since it’s just a little project, I figured it was a good place to give a zipper a try. And it wasn’t bad! I’m still not quite sure I fully understand my zipper foot and when to use which side of it, but the zipper is in and it works. I am immensely pleased with this little bag. And it got me thinking about another little project to try…

P.S. Only the zipper was purchased for this project.

Needle Case 2.0

Tuesday, March 13th, 2012

by Nancy

I had so much fun making my needle case that I decided to make another one, with a few upgrades. First, I decided to piece the outside using some of my bright scraps:

Needle Case 2.0

Then, I decided to forgo the two decorative pockets in favor of a single, functional pocket. And I opted for felt instead of flannel for the lining. Since felt is a little thicker and stiffer than flannel, I didn’t put any batting in between the outer striped fabric and the inner felt. Here is the result:

Needle Case 2.0 inside

I think it’s fabulous! It’s amazing what a sense of accomplishment I’ve gotten from such a little thing!

P.S. No purchases were made for this project (or for the first needle case). 🙂

Needle Case

Friday, March 9th, 2012

by Nancy

There’s nothing like a visit to a quilt show for sewing inspiration. Since I’ve finished my current assignment for the secret Crackpot Quilt Project, I don’t have anything specific that I’m piecing right now. Of course, I could work on one of the Unfinished Objects in the basement. Actually, with Marty’s help last weekend, I did! I’m finishing up some hand sewing on it and then I’ll be ready to show it off here.

So, I felt like starting a very small new project – something that would provide fairly immediate gratification. I remembered a cute little needle case in my book 5-10-15+ Fat Quarters that I’ve been wanting to make, and that seemed like the perfect thing. Here is how it looks on the outside:
Needle Case

And on the inside:
Needle Case inside
The pockets are more decorative than functional. The inside is flannel, and there’s a thin layer of batting in between it and the flower fabric. I’m quite pleased with the result of my efforts!

Favorites from the Quilt Show

Tuesday, March 6th, 2012

by Nancy

Marty and I were able to go to the Indiana Heritage Quilt Show this past weekend. We had a great time and were remarkably restrained at the vendors’ booths. Here are two of my favorite quilts from the show:

image

image

Fabric Fun

Tuesday, February 7th, 2012

by Nancy

So, as I mentioned in my last post, I have fallen in love with Petal Path from Quiltmaker’s March/April 2012 magazine. I am, however, being unusually self-disciplined and not allowing myself to start it it until I finish my Tulip Applique. But that doesn’t mean I can’t try out fabrics! So, here’s what I found in a trip to my stash the other day:

014

This is the first fabric I picked out. I like the soft colors and the print, though it is a bit smaller than the flower print shown in the pattern. Still, I think it could work.

010

Number Two is more of a butterfly print than a flower print, but I think that’s still allowed. It does have quite a bit of white background, which might be too much white if I use white for the background of the applique, too.

013

There’s this one, which I also like a lot, but which is also small-scale and has a white background.

012

Ooh, now we’re getting somewhere! I love this fabric! I love tulips! My Tulip Applique is still in progress, so this would have to be Tulip Applique 2. Is that too many tulips? Tulips remind me of one of my favorite places to be, both at the Festival time of year and at Other Times. 🙂 It is a directional fabric, so if I want to use it for both the vertical and horizontal panels, I will have to make sure I have enough. And then, should the applique be tulips instead of the flowers shown in the pattern? Is it still Petal Path if I change it to tulips? Or maybe Tiptoe through the Tulips? I’ll have to consult my go-to flower applique book to see about tulips for this…

But wait! Before I spend too much time pondering tulips, here is a fabric I think I like even better:

017

Wow! Isn’t this fabric great? It was purchased in the Wonderful Fabric Store in my favorite Tulip City. I had no idea what I was going to do with it, but I loved it, so I bought it. (Having a gift certificate certainly helped!) I am definitely leaning toward this one. Of course, I still have a whole corner plus a little more hand quilting to go on my other project before I can start this one, so I have time to mull it over. But what color should the background for the applique be? White? Light blue? So much fun to think about! Crackpot input is always welcome…

Latest Issue of Quiltmaker

Friday, February 3rd, 2012

by Nancy

The latest issue of Quiltmaker arrived yesterday. Some months I find several quilts that I really like, and other months I’m not really excited by any of the quilts. This is one of the months, though, where several of them caught my attention.

First of all, there’s Chain Reaction:

Chain Reaction

I don’t think I’d actually make this one, but there’s something about the pastel colors and geometric pattern that I find appealing.

Then, there’s Quiltmaker’s Garden

Quiltmaker's Garden

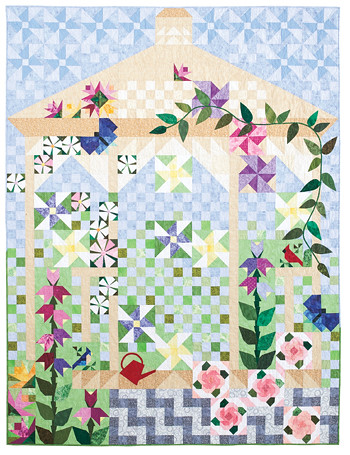
I think this one is really pretty! And I think it would be interesting to piece because of all of the different types of blocks. (Sometimes I get tired of doing the same block over and over. I am not very self-disciplined when it comes to my quilting, sigh!) I do think it would take quite a while to do, though. And it is twin-sized, and the only twin beds in my house belong to two people who prefer football to flowers.

But, best of all, here’s the one I’m completely in love with, Petal Path:

Petal Path

I just love the applique flowers combined with the large-scale flower print. So pretty! And it wouldn’t be all that hard to do because there’s no piecing of the flower print strips. That got me thinking about making it after I finally finish my Tulip Applique.

(Side note: I was working on the hand quilting on my Tulip Applique again Wednesday at the Quilting Ladies. What in the world was I thinking when I decided to do all those little hand quilted tulips in all 4 corners? Did you notice in that post that I hoped to have it done in 2010? Hah! The good news, though, is that I am very nearly done with the third corner, and then I only have one more to go. There is a light at the end of the tunnel!)

But back to Petal Path: Yesterday I ventured down to the basement to see what flower prints I had in my stash. Safe to say, there were several! I took their pictures, but I think I will save them for my next post because this post is getting long, and several bathrooms are demanding that I clean them.

I Didn’t Make You Anything For Christmas

Saturday, January 28th, 2012

Because I’ve been busy making a quilt for my bed! This is by far the largest quilt I’ve ever made, the first time I’ve pieced diamonds, and the first time I’ve done set-in seams.

Bed Quilt, ready for basting

Some background information – I decided around the time of the Wisconsin Quilt Expo that I wanted to finally make a quilt for my bed. I used the quilt show for some research and determined that I wanted a modern medallion-style quilt with a white background and bright colors. I looked through a stack of quilt pattern books at least a foot thick, and when I saw this pattern I immediately knew it was the one. Fabric purchasing and piecing started in October. I’m hoping to finish while it’s still bed quilt season here. I’m currently working on machine-quilting, but may need to put that on hold to work on some time-sensitive projects.

Some details:
Pattern: Over the Border by Kathy Doughty from Material Obsession 2. Here’s the quilt from the book. Note to anybody making this quilt: the materials list in the pattern doesn’t include the outer border fabric.

Fabric: Various prints from my LQS, stash, and an online store. Backing is an Amy Butler print from another LQS. Pet peeve: the horizontal pattern repeat on that backing fabric is such that it’s not possible to match the pattern across widths without wasting a ton of fabric, so I had to accept that it’ll just look like there’s about 1/2″ of pattern missing at each seam along the backing. So close to being able to align, and just not there.

Batting: Quilter’s Dream Wool Batting, bought online from a quilt store in Iowa. If any Crackpots want to try this out, I’ve got some 2-foot-wide pieces that I can send you – the queen sized batting was a few inches too narrow, so I bought the king sized batting and cut 2 feet off each dimension. I really like this batting – it’s wool, machine washable, isn’t supposed to shrink, and even though it’s somewhat lofty it machine-quilts well even on my machine with a fairly small space to the right of the needle. It has a maximum quilting distance of 8 inches, the largest I’ve seen for a wool batting. Always a plus for those of us who don’t have ideal sewing machines (or skills!) for machine-quilting of large objects.

You’ll note by comparing my quilt with the original that I rejiggered the colors (which I’m sure surprises nobody), and my outer border is striped (with bonus mitered corners!) instead of the inner border, but that’s because the fabric I loved for the inner border happened not to be stripey rather than any real design decision.

And, at Nancy’s request, a not-so-great picture of a mitered corner. Wavy stripes mean making them match exactly at the corner is impossible, but I think I did pretty well, and it only took a little futzing to make the 4th corner match.
Mitered corner

Second Secret Project Quilt Block

Tuesday, January 3rd, 2012

by Nancy

Today was the first day back at school for everyone.  It was nice to get back into a regular routine.

I had time today to complete the second block of a secret project.  It occurred to me that someone who shouldn’t know the details of this project might possibly visit this blog, so I have edited my first post about this Secret Project and will have to be more careful about what I post about it.

I also made the wings for Nicholas’ chickie and sewed them on.  It looks a little more like a chick now, but it definitely needs a beak!

Now a little more work on the Crochet Along Afghan while watching the Sugar Bowl, and then it’s off to bed.

New Year’s Day activities

Sunday, January 1st, 2012

by Nancy

It’s been a nice, quiet New Year’s Day here.  We’ve been watching football, and I’ve had time to work on both quilting and crochet.  On the quilting side, I worked on a  secret project.  I had written more about it, but it occurred to me that the recipient of the secret project might possibly peek in here, so I probably shouldn’t reveal much more than that Block 1 of the Secret Project is complete.  On the crochet side, I’ve been working hard at getting my 2011 Block a Month afghan assembled.   I have half the afghan – the squares from January through June – all joined together, and it’s quite nice to have on my lap while I’m working on the other pieces.  July, August, and September are connected together now, too, and I’m working on joining the October squares now.  And the two youngest members of my family have been browsing my crochet books, choosing an amigurumi animal (or two or three) that they’d like me to make for them.

Jim’s Quilt Progress Report

Tuesday, October 25th, 2011

By Ann

Finishing the assembly of Jim’s quilt top proved to be more challenging than it should have been. First there was the border problem. I cut the border strips and discovered that I had plenty of length for all 4, so I decided to ignore the standard instruction to measure the quilt top through the middle, cut the border strips to that length, and ease everything to fit, if necessary. Instead, I just pinned the strips with one end even with one edge of the quilt top, stitched, and  trimmed off the excess border fabric. Big mistake. When I tried to smooth out the top in preparation for basting, I discovered major wrinkles and bulges in the borders. The major problem was that the borders on the long sides of the quilt were too long, so I took them off and re-sewed them properly. And I reminded myself  that there are probably good reasons behind most tried-and-true quilting techniques. As you can see, the re-sewn top basted quite nicely.

But before I got this far, I had to deal with another problem. Apparently my math skills aren’t always as advanced as I like to believe. I miscalculated the amount of fabric I needed for the backing. I had plenty of width, but not enough length. So I had to resort to a modification of the Pellegrino Signature Pieced Quilt Back. Fortunately, I had enough border fabric to add the necessary additional fabric to both ends of the quilt. Since it is hard to be certain just how large the backing fabric needs to be (there’s always a fudge factor to allow for shifting during basting and quilting), I wanted the extra fabric inserted several inches in from the edges of the backing so the I would not end up with a wide strip of extra fabric at one end of the quilt and one narrow one at the other end. Here is how it came out. I hope it shows up in this photo.

Another concern I had was with the size of the finished quilt. During All Together Week, we all thought that it was wide enough, but it seemed short. So I tried it out on a twin bed, and here is what it looks like:

As we expected, the width is fine, but it is a tad short. There will not be enough length for it to be folded back and up over the pillow. I intend to deal with this problem by making Jim a couple of matching pillowcases. 🙂

I have quilted 7 of the 12 blocks. They go pretty quickly. Then there is the border, which I plan to quilt with a simple braid pattern that I have and like. I think the biggest challenge with that will be marking the quilt. Then there’s the binding. I will probably bring the quilt to the Thanksgiving gathering so that Crackpots who wish to can get their hands on it again. What thoughts do Crackpots have about a label??