Here’s how to make a working link: video that shows you how!
Or, you can view the video right here in the blog post:
Here’s how to make a working link: video that shows you how!
Or, you can view the video right here in the blog post:
Hi folks – I just upgraded the software that runs this here blog to the latest version. Apparently there’s a particulary vicious worm of some sort circulating around the interwebs that’s targeting blogs, so it was necessary to protect the security of the blog.
A bunch of stuff under the hood has been changed, and when you go to write a post, things will look different. I’m confident that you can figure it out, but let me know if you can’t find out how to do something!
Oh, also, we lost our nice quilty image in the header up there. I don’t know what happened with that, but I’ll try to sort it out when I get a chance.
Okay folks, I’ve backed up the blog software (WordPress) – at least, I think I backed up everything, this was my first experience with phpMyAdmin – and I’m about to try the upgrade. I’ve no idea what will happen to the blog in the mean time, but with any luck, we’ll be back up and running shortly!
Hang on for a wild ride!
Fellow Crackpots:
I write with potentially unfortunate news. The fabulous company that hosts the Crackpot Quilters’ Blog, Laughing Squid web hosting, has announced that on March 24, they will be upgrading one of the pieces of software on which this blog runs (PHP, for anyone who’s interested). This is a necessary upgrade, as the old version isn’t secure and needs to be replaced.
Unfortunately, this means that another piece of software on which this blog runs (WordPress, the actual blog program) will need to be upgraded as well, and this is something that I’m responsible for doing, not the hosting company. I actually should have done it a year ago or more, but I’ve had a few other projects in the hopper (as it were) and never got around to it.
I’m quite sure that I don’t have the time or mental energy right now to upgrade WordPress, much less to have it done by March 24, and I honestly don’t know when I will have the time. (Sometime after our taxes are done, we’ve found daycare for James, and the semester’s over, is my guess.)
I have no idea what will happen to the blog when the upgrade takes place in a week and a bit. It’s possible that it will still function just fine, though I think that’s unlikely. I doubt highly that it will vanish into the aether, though I will try to find time to make a backup just in case. My guess is that posting, commenting, etc. won’t work, but that whatever’s here will still be accessible. We’ll just have to wait and see.
My apologies for this: the blog has been far more successful than I dared hope when I started it, and nearly all of the credit goes to the rest of you, for posting and commenting and keeping it going. I really don’t want to let it slide into obscurity, so I’ll see what I can do once I clear a few things off my plate. Thanks for your patience!
pssst, Rebecca: wanna mess around with a WordPress installation? I think I can set you up a user account on the hosting plan if you want…
Hi everyone – I’ve taken advantage of the “Links” function in the blog to add some, well, links, to the sidebar. So far we have three categories: quilting links, crafty links, and “shameless commerce division.” I don’t have much in the quilting links section yet, but there’s a good deal in the crafty section, and a couple of good places to spend money as well.
Y’all can add links, and I think create new categories as well, just by using the “links” tab on the back end of the blog (it’s just to the right of the “write” tab). So if you know of any good sites that we all should know about, go ahead and add them!
Two additional notes: Rebecca, if you haven’t discovered it already, you really must go check out the “You Knit What??” blog. It’s hilarious. And I just noticed that if you’re looking at the site in Internet Explorer for Windows, a lot of the layout is all wonky. My apologies! it’s all wonky because there are some really large-sized photos on the front page, which breaks some of the formatting. Mozilla, Firefox, and Safari all resize the photos to make them fit, but IE doesn’t.
If you’re using IE and seeing the messed-up formatting, could you please comment below and let me know? If it’s a problem, I’ll see what I can do to shrink the photos. Remember when you’re uploading a photo, if it’s wider than about 500 pixels, you can have the blog create a thumbnail image for you automatically – just select the “small” thumbnail option when you upload it.
In the mean time, clicky clicky on the linky linkies!
What are your thoughts on allowing the general public to add comments to our posts? I think it would be nice if friends-who-aren’t-relatives could add comments on our lovely creations, and I know wordpress has various ways to reduce/avoid comment spam.
Hi there, Crackpots! I’m so happy to see everyone using the blog! This is really very exciting.
Since people have very different ideas about online privacy, anonymity, and security, and have very different “comfort levels” with these issues, I thought I should take a moment to talk a little bit about some of the factors I took into consideration when setting up this blog, so that everyone knows what’s going on and is comfortable with it, and has a chance to comment on it.
You may have noticed that we’re all identified here by our first names only, and that the various relationships between us (daughter, sister, other-in-law) aren’t explained anywhere on the site. While I wrote that we live in North Carolina, Michigan, Indiana, and Wisconsin, I didn’t say who lives where, nor did I say what cities in those states. Also, our email addresses never appear on the public side of the blog. And there are no photos (yet) of any people – only quilts.
All of these were very conscious decisions that I made in setting things up. Many people are perfectly comfortable using their full, real names and photos online (see www.freerangelibrarian.com or www.librarian.net for good examples). Many people feel very strongly about NOT ever having their full names, identifiable photos, etc. available online, and there are very good personal-safety reasons for being somewhat paranoid about that.
I fall somewhere in the middle of that spectrum: while I’m not happy about identifiable photos of me online (there currently are one or two, but not many), I’m not going to go to great lengths to avoid them. Likewise, my real full name and identity are online and available for legitimate professional reasons. But there are certain more frivolous aspects of my online life that I prefer to do under a pseudonym, for similar professional reasons: I don’t necessarily want a future employer to find my goofy posts to an online forum about The West Wing, or what have you.
So what I’ve tried to do with our blog is set it up at a pretty high level of privacy and anonymity, so that everyone will be comfortable at the outset. We can work out the details as we go along (and I’m sure we’ll all be respectful of each others’ comfort levels on these issues). Some things to consider as we’re going along:
I hope this doesn’t sound like I’m setting up a bunch of strict rules – mostly these are just guidelines that I’ve encountered in a lot of years of observing online conversations and communities. I want us all to be comfortable with the level of security we have with the blog, and I think we should talk about it if we have any questions or concerns. Okay? Please let me know what you think (and sorry for the epic length of this entry!)
Crackpotters – Have you noticed that you get an apparently automatic e-mail message whenever someone posts a comment to one of your posts on the blog?? Pretty cool! Except it’s also a little weird if you post a comment to your own post. Then you get an e-mail telling you what you just did! Also, since it tells you what was said in the comment, it sort of makes it superfluous to go dashing off the the blog to see what was said, but I do that anyway!! 🙂
Welcome, Crackpots, and Merry Christmas!
This is my Christmas present to all of us: a weblog, or “blog,” that I’ve put together so that we can have a place on the web to share our Crackpotty projects and other stuff. We can post pictures and stories, and comment on each other’s projects and ideas.
Each of you has been given a username and password for access to the blog, and I’ve written up a series of entries that show you how to use the blog, going in gradual steps from logging in, through commenting and posting entries, all the way to uploading digital pictures and adding them to your blog entries.
One thing that sets this website apart from other blogs is that we five are (hopefully) the only people who can post entries and comments. Many blogs are set up with one or several authors, and then comments are open to the whole world. I figure we don’t especially care what the whole world thinks of our quilts and other Crackpot projects, so I’ve set things up so that only the five of us can participate.
Since I’ve set up the blog (and the web domain registration, hosting, and all the other stuff that goes along with this), I’m the administrator of the blog and have administrative powers to do all sorts of things, and fix all kinds of problems. The end result of which is, if there’s a problem or you can’t figure out how to do something, let me know! I’ll do whatever I can to fix the problem. If you’d like some technical information about the blog, you can read The Fine Print.
Because blogs are generally set up so that the most recent entries are at the top of the page, and proceed backwards in time, the “how-to” entries that I’ve put together are in backwards order. So to get started, scroll down to the bottom of this page, to the entry titled “How to log into the blog,” and start reading the directions.
Have fun!
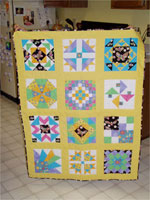
Here’s a photo of Andrew’s bug quilt (the same photo, in fact, that supplied the image up in the blog header). How did I get it to the blog so that I could show it off to the rest of you, and how can you do the same thing with your photos?
It’s a bit complicated, but it’s kind of the main reason why I put the blog together, so stick with me here while we go through all the steps.
First off, you’ll need the photo. You’ll probably want to edit it somewhat after you take the picture, to reduce the size of the image (in pixels) and the size of the file (in kilobytes). Right now the blog is set up so that you can upload a photo as long as it’s less than 300kb in size – if that becomes a problem I can change it to a larger file size. You will probably want to make sure that the photo is no more than 500 pixels wide – that’s about how wide the main part of the screen is on most browsers. If you’re not sure how to do that, there are some ways around it that I’ll show you.
Once you have your image file saved on your computer, head to the “back end” of the blog and click on the link at the top that says “Upload.” You’ll see the screen for uploading a file, which looks like this:
Click on the “choose file” button and navigate to wherever you have your photo saved.* Once you’ve selected your photo, a little icon and the filename will appear next to the button.
*Mom and any other Macintosh users out there: if your photo is in your iPhoto library, ask me for help in how to find it.
The “description” box should just contain a few words about the photo – what you type here won’t show up on the entry, so don’t write a whole huge paragraph. For the photo I used in this entry, it just says, “Andrew’s bug quilt.”
The last bit gives you the option of creating a small “thumbnail” of your image, which appears on the blog entry. If a reader clicks on the image, they’ll be taken to the full-sized photo. This is a good option if you’re not sure how to resize your photo so that it’s less than 500 pixels wide. For the photo I used in this entry, I already had it shrunk down pretty small, so I didn’t bother.
When you click on the “upload file” button, you SHOULD get a message that indicates that your file uploaded successfully. If you don’t, let Cathy know! With luck, she can fix whatever the problem is. You’ll also get another very important piece of information: the code that you should use in your blog entry to get the image to show up:
Just copy that line of code, and paste it into the main part of your entry, like this:
That’s all there is to it! It’s a lot of steps, but it should work. You can also (I’m pretty sure!) use a photo in a comment: just cut and paste the link into the comment text. As always, if it doesn’t work for you, ask Cathy! Now:
Your last assignment: post an entry or a comment with a photo!
SPECIAL BONUS GEEK INFORMATION: As an added bonus, you can use the file-upload space as web hosting for photos that you want to use elsewhere. You’ll need to edit the link just a bit, but it should work, if you don’t have web-hosting space anyplace else. So for example, if I wanted to link to the photo above on a completely different website, I’d change the link to read: src=”http://www.crackpotquilters.net/wp-content/photos/bugquilt.jpg”. If you have no idea what this means, don’t worry! But if you do know what I’m talking about, feel free to use it! We have lots more disk storage space and bandwidth quota than we will ever need.